Charge
|
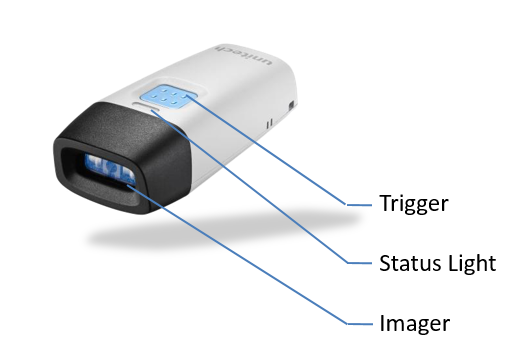
When not in use, the scanner should remain connected to its power supply. To charge the scanner simply lift the protective rubber flap and insert the USB mini connector. The status light at the top of the device will glow orange to confirm it is charging. When charging is complete the status light will turn green. The scanner does not require a full charge to be used, and as little as 15 minutes charge time may be sufficient to complete a full grocery order or other planned activities.
|
|
Pair
|
To ensure a successful pairing, first read the step and then scan the associated barcode, if there is one.
1. On iPad go to Settings > Bluetooth and ensure Bluetooth is enabled.
2. On this same screen ensure there is no "Wireless Scanner" listed under "My Devices". If you see a Wireless Scanner listed, tap the Information button ("i" with circle around it) and select "Forget This Device" and then disable Bluetooth.
3. Press and hold the blue trigger button on the Bluetooth scanner for 1 second until a beep is heard. The scanner is now on and ready to scan barcodes.
4. [SCAN] Reset the Bluetooth scanner to ensure any old settings are cleared.
5. [SCAN] Enable keyboard toggle.
6. [SCAN] Enable UPC-E to UPC-A.
7. On the iPad go to Settings > Bluetooth and now re-enable Bluetooth. Remain on this screen.
8. [SCAN] Initiate pairing with iPad.
9. Back on the Bluetooth settings screen of the iPad, "Wireless Scanner" will appear in a list of available devices. Select it.
10. "Wireless Scanner" should now show as being connected on the Bluetooth settings screen.
If a pop-up appears on screen prompting for a 4 digit pin, please continue with steps 11 through 13.
11. [SCAN] Enter pin entry mode.
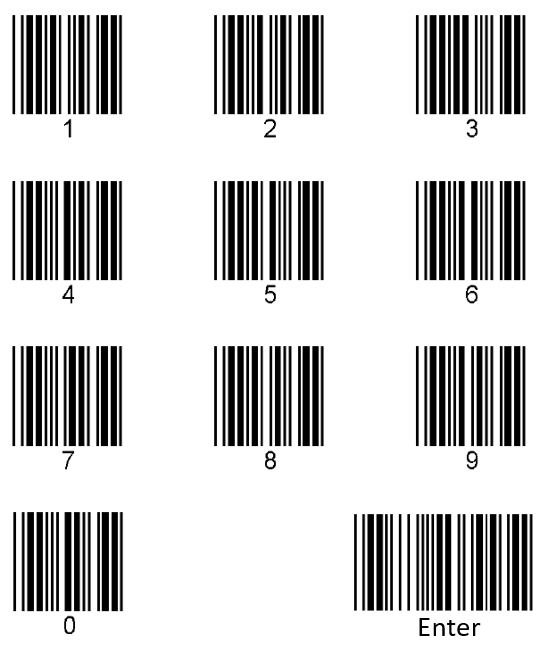
12. [SCAN] Use this table to input the 4 digit pin that the popup displays. Example, if popup displays "1234", scan the barcode associated with each of the pin numbers. [SCAN] Once the 4 digit pin has been scanned in, scan the "Enter" button in the table.
13. [SCAN] Exit pin entry mode.
|
|


Troubleshoot
|
Coming soon!
|